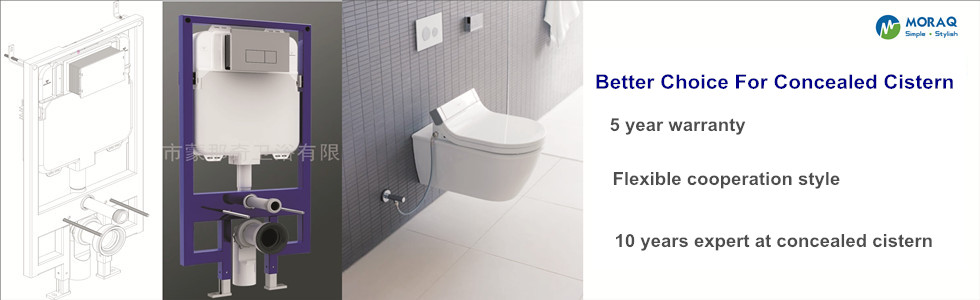
MORAQ
MORAQ

Product List
Concealed Cistern Installation Guide
2015/1/17

For MORAQ concealed cistern we have explained clearly the installation Operation in 2 parts. Before Mortaring Process for Installation of Concealed Cistern

For a fast and accurate installation you will need;

Drill, Saw, Water Gauge, Tape Measure, Spanner ( 19 – 22 ), Hammer, Screwdriver 
First Step

  • Remove the lower part of Soil Pipe Clamp by bending it to both sides.
  • Fix the Soil Pipe to the Clamp.
  • Measure the mounting hole of the Wall Hung WcPans. This length is usually 18 cm.
  • First adjust the bolt nuts behind the console according to the measurements of the WC pan and then screw the rods to these bolt nuts.
Second Step
  • Open Side Lobes of the Supporting Console
  • Measure the length between the Mounting Hole of WC Pans and Bottom of WC Pans. ( Consider the Filling and Tile height ).
  • From the ground to the Rod , length should be 32–33cm.
  • Tighten Nuts with the Spanner when you fix the height carefully.
Third Step
  • Place the Concealed Cistern to the point of settling in order to adjust the height of the Soil Pipe.
  • Mark it carefully then cut the pipe to suitable height.
  • Control the straightness of the Concealed Cistern with Water Gauge while fixing the Carrier Legs.
  • Mark the points that will be drilled.
  • Side lobes, Inner Lobes, Carrier Legs.
  • Drill the marked areas using 10mm drill bit.
  • Fix the Rawl Plugs (pegs) into the holes.
  • Carefully place the Concealed Cistern then insert the screws.
  • Tighten the screws with screw driver and spanner.
  • Control the straightness of the Concealed Cistern with Water Gauge again before tightening the nuts.
Fourth Step
  • Remove the Plug at the top of the Cistern and open the Window in front of the Cistern.
  • Fix the BranchTap to the Plumbing Pipe.
  • Use the Sponge to prevent inclusions to the Concealed Cistern.
  • Fix and tighten the Branch Hose to the Tap and control the system.
  • Then plug the protector box and Concealed Cistern Window.
Fifth Step
  • Place theWindow Cover.
  • Place the protective plastic to the Rods and also place the Stoppers to the Elbow Pipe and Soil Pipe. Do not remove these protectors until the end of Mortar Process.

Concealed Cistern Installation Process After Mortar

First Step
  • Remove the Protectors.
  • Measure the Elbow Pipe and Soil Pipe then cut them to proper height.
  • Cut the Rods to proper height.
  • Place the Wc Pans and tighten the nuts.
Second Step
  • Set theToilet Seat.
  • Remove the Concealed Cistern Window Protector.
  • Screw the Button Adjustment Piece.
  • Fix the Concealed Cistern Flush Plate’s Frame to the Window.
  • Set the Button Adjustment Piece into the Concealed Cistern Flush Plate then plug the Flush Plate.
  • Installation Finished. Beneath these tiles, is a product only 8cm thin and a brand, trusted for 50 years.

Contact

Contact us

Address: Fu'an Industrial Center, Leliu Town, Shunde district, Foshan City, Guangdong, China

Post code: 528300

Tel: 0086-757-22220575

Fax: 0086-757-22220578


Service

| ABOUT US | PRODUCTS | CONTACTS |

Friend Link: MORAQ DOMESTIC 蒙那奇中国站;
Copyright(C)2009-2016 MORAQ SANITARYWARE COMPANY LTD